CRAZY!!!!
I'm so crazy today.!!!! The sound of the driller from the next house is terrible. It makes me crazy. Please stop!!!!
Although today I got lots of money ^-^hahaha. I'm thinking of something to spend for. :D
Tuesday, September 29, 2009
Monday, September 28, 2009
last weekend
It was not my happy weekend which I expected. My dear and I had an argument about something stupid. I felt so bad. Because I always want to make him happy. But it's ok now. And I had to do lots of homework huhuhu. Many plans weren't carried out. :(
Tuesday, September 15, 2009
continue or not?
Last night, ACET staff, who is a kind and lovely guy but we all "hate" him, came to notice about the registration for the new course. Many my old friends delayed the next course. And me too. Actually, I want to stop studying at ACET because I feel so tired after 7,5-month period for studying at night without relaxing. I got a high score of assignment #1, it encouraged me so much. It also makes me confused of my decision. Continue or not? >"<
The most important thing now is I have to stop doing my favorite thing to focus on studying. But it seam a hard mission ^-^
The most important thing now is I have to stop doing my favorite thing to focus on studying. But it seam a hard mission ^-^
Thursday, September 10, 2009
Wishlist
This post from http://www.kaboodle.com/reviews/sew-mama-sew-blog-spring-sewing-~-spring-ruffle-top-tutorial

Step 1: Take your chest and hip measurements. Measure around your chest, with the measuring tape under your armpits and above your bustline (this is NOT the fullest part of your chest). Round this number to the nearest inch, add 1” for ease, divide by two, then add 1” for seam allowances. Example: My chest measurement is just over 35 inches. So: 35” + 1” (ease) = 36” / 2 = 18” + 1” (seam allowances) = 19” (we will call this “X”) Here is the formula for you to use: ____ + 1” = _____ / 2 = _____ + 1” = ________ inches Next measure around your hips at their fullest point. Divide this number by 2 and add 1” for seam allowances. Example: My hip measurement is 41 inches. So: 41” / 2 = 20.5” + 1” (seam allowances) = 21.5” (we will call this “Y”)
Wednesday, September 9, 2009
a useful link for health
http://officeworkout.msn.com/
I promise myself try to do exercise everyday. However, it seems a hard work to do, hehe. I hope this link can help me.
I promise myself try to do exercise everyday. However, it seems a hard work to do, hehe. I hope this link can help me.
Tuesday, September 8, 2009

Skirt
This post is from http://www.kukyideas.com/journal/2006/07/tiered-skirt-tutorial.html
I made another skirt for Isabelle using 3 Peas tiered skirt tutorial. She no longer has her blog so I asked her permission to post her tutorial here.
Supplies needed:
Notes
All seam allowances are 5/8″.
The things I did differently are in red.
Measuring
To begin, you will need to determine the dimensions of the strips you are going to cut.
Step 1: Measure the waist and hips (in inches) of the intended wearer. Choose the larger of the 2 measurements, we will call this number “A”. You also need to determine the desired length of the finished skirt, so measure from the waist to where you want the hem to land; divide this number by 3 (you can do a little rounding here to make your life easier, maybe choose the closest 1/4″ or 1/2″ increment). Call this number “B”.
For example: peri has a waist measurement of approximately 20″ and the finished skirt should be about 13″ long.
A=20
B=4.5 (after rounding up)
Step 2: (sorry to bring algebra into the picture)
(A x 1.5) + 1.5 = _____ “C”
Again, you can round your answer a little, this is not an exact science.
Example:
C=31.5
Step 3: You will cut 2 strips to make the top tier.
C divided by 2 = ____ width of each strip
B + 2 = ____ height of each strip
Example top tier: width=15.75″ height=6.5″
Step 4: You will cut 2 strips to make the middle tier.
C multiplied by 1.5 = ____ then divide your answer by 2 to equal your width ____
B + 1.25 = ____ height of each strip
Example middle tier: width=23.75″ (after rounding up) height=5.75″
Step 5: You will cut 3 strips to make the lower tier. Cut these strips to the same dimensions as those in Step 4. I decided to make 2 strips for the lower tier instead of 3 because I wanted the seams to match up. So I took the width of the middle tier multiplied by 3 = ____ then divide that by 2.
Example lower tier: width = 35.75″ (after rounding up) height=5.75″ 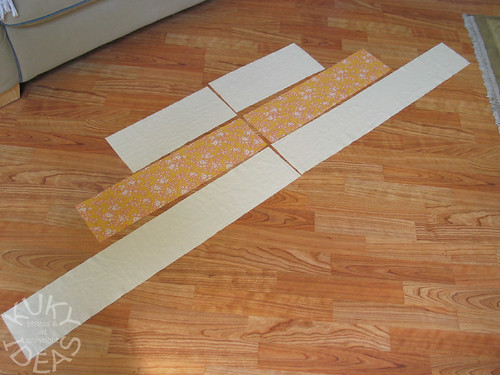
Now we have all of our pieces and are ready to start sewing!!
Sewing the Skirt
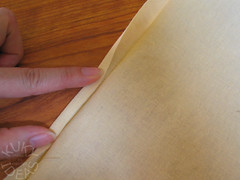
1. With right sides facing each other, sew the side seams together on each set of strips (remember for the lower tier you have 3 strips to sew together. well not my way. My way is 2 strips for each tier). Edge finish each of these seams with a serger if you have access to one, otherwise trim the seam allowance to about 1/4″ and zig-zag stitch to keep your raw edges from unraveling. You now have 3 “loops” of fabric, one for each tier. 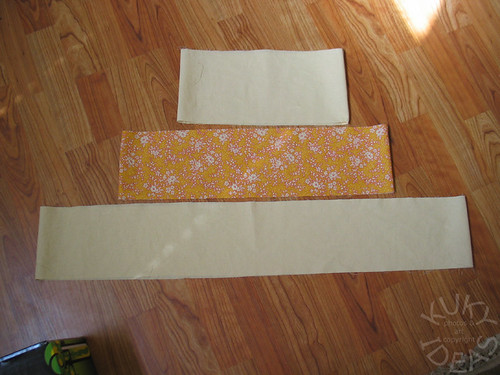
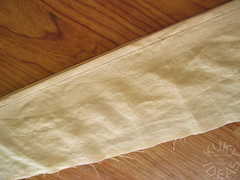
2. At this point, I like to go ahead and sew a narrow hem around the entire bottom edge of the lower tier. Press up 5/8″, open the fabric back out, and press the raw edge in to meet the first crease. Sew the hem. 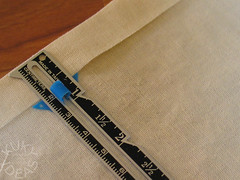
3. Edge finish the upper edge of the top tier, fold 1 1/4″ to the inside and press to form a casing for the elastic. Stitch about 1″ in from the fold almost all the way around, leaving a small opening to insert the elastic into later.
4. On the top edges of the middle and bottom tiers (and with right sides facing out), sew a long machine basting stitch all the way around 5/8″ from raw edge and also 3/8″ from raw edge.
And another change I made. I actually did 1/2″ from the raw edge and 1/4″ instead. I found out with Isabelle’s first skirt that I am a crap sewer and sometimes cannot sew straight. Doing it this way leaves 1/8″ margin for error. Which believe me I needed. You may not but obviously I suck. 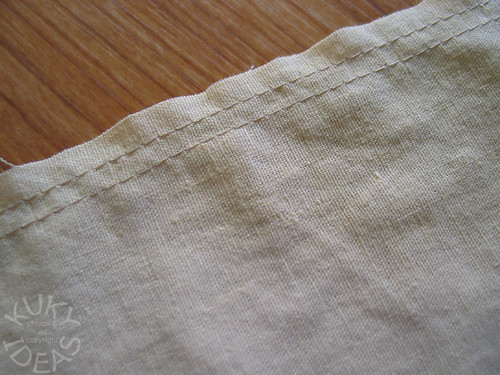
5. Starting with the bottom tier, grasp the bobbin thread ends and start pulling gently to form gathers in the fabric. When the circumference of this edge matches that of the lower edge of the middle tier, stop and tie your bobbin threads together to keep everything in place. Then slide the gathers around until you are happy that they are distributed fairly evenly. 
Update: I added some new pictures with a new skirt. Hope the different fabric doesn’t throw anyone off. 
6. Flip the middle tier inside out so that the right sides (the outsides of your fabric) are facing each other and pin it to the bottom tier — the bottom edge of the middle tier (the edge without the basting) should match up to the top gathered edge of the lower tier and the right sides should be together. Now machine baste this seam. I machine basted at 1/2″ (again the whole sewing straight thing). I’m usually one that skips the basting steps, but, trust me, basting is your friend on this project! I also reduced the pressure on my presser foot for this step, don’t forget to readjust the setting after you baste. 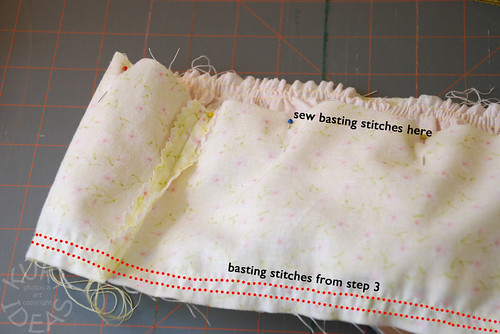
Now you can flip it right side out and check your gathers. Don’t worry if you see the basting stitches from where you gathered the bottom tier. When you sew the seam at 5/8″ you won’t see them anymore. 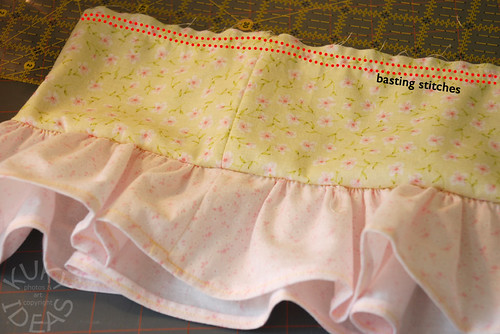
7. Repeat the procedures from Steps 5 and 6 to attach the middle tier to the top tier. 
8. Now serge or sew the seams you just basted using a 5/8″ seam allowance (trim and finish your edges if you used a regular sewing machine for this step). 
9. Thread your elastic through the top casing. I like to use a big safety pin to help me work it through. Adjust the elastic to comfortably fit waist. Overlap the ends and sew them together (I used several rows of zig-zag stitch and zig-zag back-stitching for security). Using a straight stitch, sew the opening of the waistband casing closed.
You’re Done! 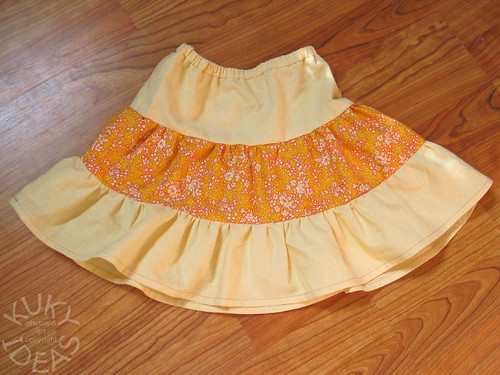
YAY! And that was 3 Peas tiered skirt tutorial. Too bad I don’t have her pictures. I’m sure she had more pictures showing everything in more detail then what I did. But her directions are quite clear and it was quite simple to make this skirt. It was totally awesome of her to share her tutorial! Thank you 3 Peas!
Sewing in a Foreign Language
This post is from: http://thoughtandthimble.blogspot.com/2007/09/sewing-in-foreign-language.html
It is not necessary that you read Japanese characters to sew in Japanese. You don't even need a friend who does. All you need are metric measuring tools (which you probably already own, just look at your seam gauge) and intermediate sewing skills, or beginning skills with a good sewing manual and extra patience, and your new Japanese pattern book, of course.
1. Selecting your Japanese craft book.  First you need to choose your books. Yes, if you are reading this, it will likely be books plural by the end of this paragraph. Look at pictures and collect ISBNs from Crafting Japanese, Wee Wonderfuls, and Molly Chicken for starters. If you are sewing for little girls, Girly Style Wardrobe, ISBN 457911132X, is a great place to begin. It's instructions are quite clear, the projects simple, and the results very satisfying.
2. Purchasing your books.
Did you go browse? Good. Now that you have a nice wish list, you need to decide where to buy your books. Superbuzzy, Etsy, ebay, Amazon Japan, and YesAsia all sell them. Etsy and ebay are actually good places to 'see inside' the different books as the sellers there often post lots of photos. And it looks like Amazon Japan has vastly improved their English site, as I was able to look up Girly Style Wardrobe without an ISBN, so that may be the new way to go. That said, I've bought my small collection of five sewing pattern books from YesAsia. I entered the ISBN in the advanced search (no dashes or spaces), and ordered enough to qualify for free shipping. One credit card number and three weeks later, voila!, I had my booty.
3. How to use your new Japanese pattern book. 
The hardest part is deciding which project to sew first. We'll look at this sweet tie-shoulder top, project 'a' from Girly Style Wardrobe. After removing the folded pattern sheet from the book, check your measurements for the correct Euro size and look for the set of lines marked 'a' in size 100cm (for example, do use your own size). Trace them onto freezer or pattern paper.
Important: Before you cut the pattern pieces out, add the seam allowances shown on the cutting layout. 
The cutting layout is on the instruction page in the back of the book, along with the amount of fabric you'll need. If your project calls for elastic or bias tape, you will also find those lengths if you study the characters labeling those items in the illustrations, then look for the same characters near the measurements above the cutting layout. (Click the photo for a readable size.) Now you are ready to cut your fabric, follow the pictures, and sew! Yes, you are right. That was easy.
Monday, September 7, 2009
I can sew, can’t I?
I’m a such of imitative person. When I see something which ppl are talking much about it, or doing it, I want to have it immediately. My sewing machine is a good illustration of this. When I saw sis Pnghi’s Janome, I love it instantly. I asked my dear to go with me to buy it one week later.
And here it is:

I love it so much, now I know I can sew. I remember when I was a little child, I used to play with my grandma’s sewing machine. But I didn’t make anything completely. haha… And I thought that I had no ability to sew anything.
Not only sewing, there are many stuffs I’m enjoying, such as crochet, cross stitch, non stitch, sewing… Everything just started, I need to learn and practice more to make perfect stuffs.
Ah, another thing I want to do is cooking. I’ll do it someday ^-^
hard working
Technorati Tags: sewing
Last weekend, I did many stuffs with all of my enthusiasm. In Friday evening, I tried to finish a bean bag. After that, I realized that it's too big in my room although I love it so much. I decided to give it to my cousin. Here it is:  It it a nice and soft bean bag with some embroidery:
  A crochet product which was finished at a coffee shop in last Saturday morning:
 A dress with a wrong collar, but it's OK. It was my first dress making. So I love it whatever it's nice or not. haha
  Saturday evening and the whole Sunday, I spent all time in sewing 2 dresses for the lovely girl living next door. I'll post the picture later. It was so exciting!!! I love sewing, although it makes my vertebral column hurt.
Wednesday, September 2, 2009
hometown
It's about 7 months I didn't come back my hometown. There are many reasons, but I came back with my dear and my little Thu's family last weekend. Thu went with us by bus, while her parents rode motorbike. We arrived home at noon and waited for her parents till night. We had so much fun! I like ppl in family sit, talk and laugh together.
In the next day, we started to go to Núi Cấm at 7 am. The distance between my house and Núi Cấm is not very long, just about 90kms. So it took 2 hours driving. I really loved the scenery outside the car's windows. You can see all of the activities of Southern ppl. When the moutain appeared at the horizontal, it means we nearly arrived in Núi Cấm. I can smell the fresh and cool air of this place.
The narrow path to go up to the pagoda:
 The mighty scenery:
 My family:

My grandpa, uncle 5 and uncle 4 who was pushing the wheelchair:
 I love this pic so much:
 Nice stairs:
 A corner of Vạn Linh pagoda:
 My cousin:
 Uncle 5:
 When these men went to the top of the mountain, the rest stayed at Vạn Linh pagoda to wait.
 Palm tree, a special feature of this place:
 We also dropped by the Duty Free Supermarket in Tịnh Biên, the boundary between VN and Campodia.
 Finally, we visited the temple of "Bà chúa xứ núi Sam" before backing home:
 We arrived home at 5pm, still early but all of us were very hungry. So, my mom cook for us many dishes, hehe


We ended the trip with much fun and happiness. My grandpa said that he's satisfied. This is his dream when he was young. At that time, he was so busy in business so he couldn't go. I feel so bad because he couldn't make the most of this.
In the next day, we started to go to Núi Cấm at 7 am. The distance between my house and Núi Cấm is not very long, just about 90kms. So it took 2 hours driving. I really loved the scenery outside the car's windows. You can see all of the activities of Southern ppl. When the moutain appeared at the horizontal, it means we nearly arrived in Núi Cấm. I can smell the fresh and cool air of this place.
The narrow path to go up to the pagoda:
The mighty scenery:My family:My grandpa, uncle 5 and uncle 4 who was pushing the wheelchair:
I love this pic so much:Nice stairs:A corner of Vạn Linh pagoda:My cousin:Uncle 5:When these men went to the top of the mountain, the rest stayed at Vạn Linh pagoda to wait.Palm tree, a special feature of this place:We also dropped by the Duty Free Supermarket in Tịnh Biên, the boundary between VN and Campodia.Finally, we visited the temple of "Bà chúa xứ núi Sam" before backing home:We arrived home at 5pm, still early but all of us were very hungry. So, my mom cook for us many dishes, heheWe ended the trip with much fun and happiness. My grandpa said that he's satisfied. This is his dream when he was young. At that time, he was so busy in business so he couldn't go. I feel so bad because he couldn't make the most of this.
Subscribe to:
Comments (Atom)